Solar power can remove your dependency on the grid or reduce your energy bills. It can power your adventures in an RV, campervan, or tent. And it will fill you with confidence that comes from creating your own power. To join the sun-powered revolution, you’ll need to know how to connect solar panels.
Figuring out exactly how to wire your solar panels together can seem intimidating. But I’m here to help guide the way in a way you can understand.
In this easy-to-follow guide, I’ll walk you through the basics of wiring solar panels, including:
- Series vs. parallel
- Connectors to use
- A few other fundamentals
Once done, you’ll be able to connect your solar panels and start soaking up energy from the sun.
We carefully select the products and services we link to. If you buy through our links, we may earn a commission. There’s no extra cost to you and it helps us provide this information.

Connecting Solar Panels: Quick Summary
Before going deep into the details, let’s start with a very brief overview of what you need to know to connect your solar panels.
Understanding your solar panel needs is the first step. This means calculating the amount of solar panels you need, rated in Watts. This is covered in detail in our post on How to Calculate Solar Panel Needs.
The next part of knowing how to connect solar panels is deciding on series vs. parallel. This article covers this in more detail, but here’s the quick breakdown:
- Series: Voltage adds up, but amperage is single-panel output
- Parallel: Amperage adds up, but voltage is single-panel output
Finally, you’ll have to actually work with solar panel connectors. This includes connecting solar panels to each other, as well as connecting them to the grid, your battery, an inverter, or other use. We’ll go over all this and more.
You can also use our calculator to automatically calculate How Many Solar Panels Can Your Power Station Use. After you provide the power station and solar panel specifications, it tells how many panels you can safely use. And it provides an illustration of what that looks like. We HIGHLY recommend checking out this additional tool along with this article.
Caution: This guide is a basic introduction to connecting solar panels. It’s important to have the proper understanding of electrical systems and safety before installing solar panels. Use this guide with caution and at your own risk.
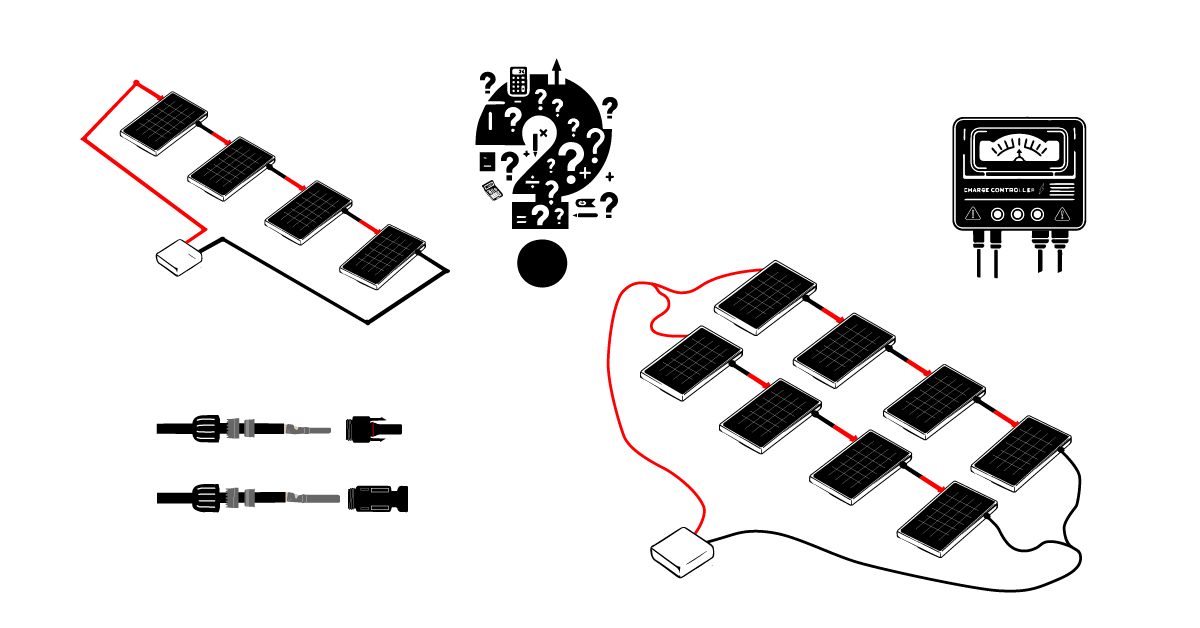
Series vs. Parallel Solar Panels
When deciding how to connect solar panels, series vs. parallel is going to be one of the most important items. How you wire the solar panels will have a major impact on the electricity coming from them.
If you do this wrong, you could damage or destroy your solar charge controller. They have specific ratings you cannot exceed.
You want to remember that Watts equal Volts times Amps (W = V x A).
As you increase the size of your solar panel array in Watts, you must increase either the voltage or the amperage. Series vs. Parallel determines which you change.
Series increases volts to get more Watts. Parallel increases amps to get more Watts.
Series connections and increased voltage is the one to watch for. If you go over the input voltage, you’ll cause problems. Parallel connections and too much amperage will not be a big concern, and some people do it intentionally to maximize charging.

Connecting Solar Panels in Series
The first option is to wire your solar panels in series. Connect the positive terminal from one solar panel to the negative terminal of another. Do this between every individual panel.
Then you’ll have one positive terminal open on one side of your series solar panel array. And one negative terminal on the other end. You attach these to your solar charge controller.
Connecting solar panels in series will:
- Add up the voltage from each panel
- Use the lowest amperage from any single panel
Let’s say you have 200W solar panels rated at 20V and 10A each. If you connect four of them in series, the output is four times the voltage (80V) at just 10A. The end result is 800W at a higher voltage.
The downsides to wiring solar panels in series are:
- Output voltage can get high and you must stay within the charger rating
- If one solar panel is in shade (or malfunctions), it can bring down the entire array
The benefits of series wiring are:
- Keeps amps low, allowing you to use thinner gauge wires
- Can reach minimum charging voltage more easily, better for cloudy days

Connecting Solar Panels in Parallel
The other option is to wire your solar panels in parallel. Connect all of the positive terminals from each panel together. And then you’ll do the same for all the negative terminals.
Wiring in parallel creates two “clusters” of connections, one positive and one negative. Each panel has a wire going straight to each cluster.
From these clusters, one negative output and one positive output goes to your solar charge controller.
Connecting solar panels in parallel will:
- Add up the amperage from each panel
- Use the lowest voltage from any single panel
Let’s say you have the same four 200W solar panels, rated at 20V and 10A each. If you connect them in parallel, you will stay at 20V but will ramp up to 40A. This still equals 600W, but now with higher amps.
The downsides to wiring solar panels in parallel are:
- As the amps increase, the size gauge of the wire must also increase
- Reaching minimum charging volts in poor sun conditions can be more challenging
- You need an appropriate parallel connector adapter
The benefits of parallel wiring are:
- Works must better in mixed light conditions with shade over some panels
- Keeps voltage low, which helps to use lower-cost solar charge controllers and solar generators
If you’re considering a parallel connection, make sure to get your parallel adapter. These from BougeRV offer an excellent value and come from a reputable company:

|
BougeRV Solar Parallel MC4 Connector 2-to-1 Adapter |
Buy on BougeRV Buy on Amazon |

|
BougeRV Solar Parallel MC4 Connector 3-to-1 Adapter |
Buy on BougeRV Buy on Amazon |

|
BougeRV Solar Parallel MC4 Connector 4-to-1 Adapter |
Buy on BougeRV Buy on Amazon |
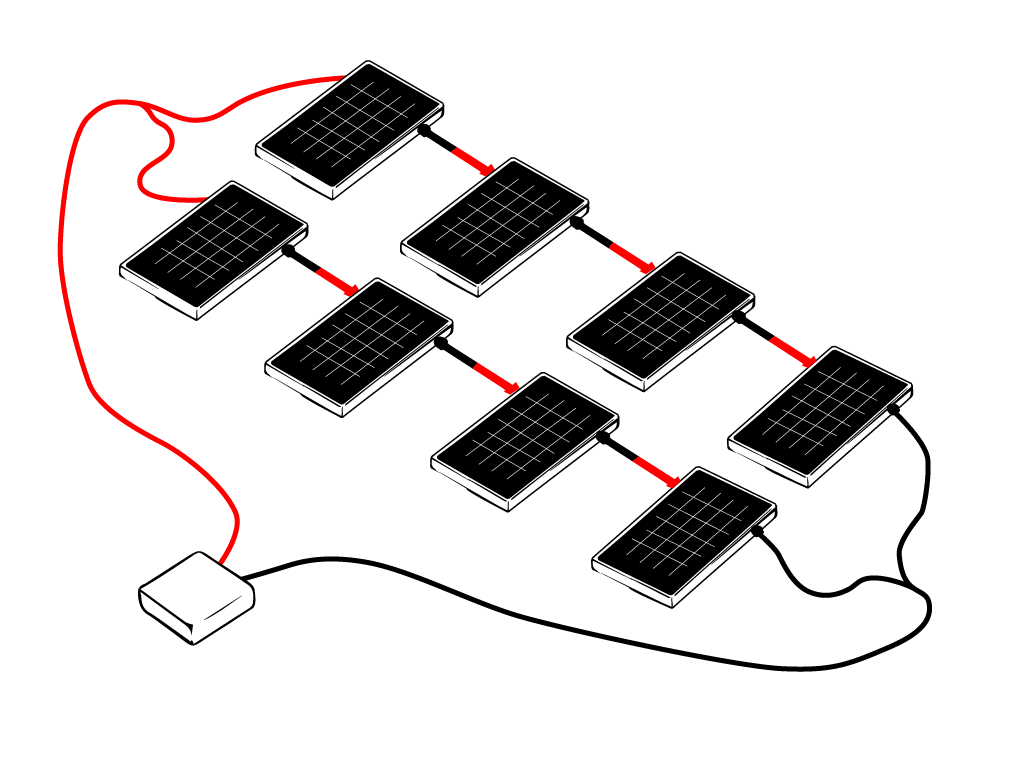
Combination of Series and Parallel
Using a combination of series and parallel connections can be ideal. You can add a lot of solar panels while staying within your charger’s limits.
You get the benefits of both types of connection. A little shade doesn’t knock out your whole array and you can use thinner gauge wires than parallel would allow.
Let’s say you want to create a large solar panel array. Let’s use eight of the same 200W solar panels (20V and 10a) from the other examples, for 1,600W in total.
Let’s combine series and parallel wiring for these solar panels.
There are many ways to use both series and parallel. We can create two “strings” of four panels connected in series. Then we can connect these two “strings” in parallel. This would mean two cables are coming into each parallel connection “cluster.” And the result is:
- Two different four-panel series: 80V and 10A each (ten times the voltage, but single-panel amperage)
- Attach those two series together with parallel connection: 80V and 20A (double amperage, no change to voltage)
The final result here is quite reasonable for a 1,600W array. And it’s much better than doing all series (160V at 10A) or parallel (20V at 80A). For large solar panel arrays, a combination is usually best.

How to Connect Solar Panels
Now let’s talk about literally connecting the solar panels together. How does that work?
It’s pretty simple.
- To connect panels in series, most people opt for MC4 connectors. They’re easy to work with. And you don’t need anything special at each series connection.
- To connect in panels in parallel, you’ll need to purchase specialized parallel splitters for each parallel connection. You’ll likely also use MC4 connectors, but they must go through a particular adapter. A single solar array only uses two of these adapters, one for the positive side and one for the negative. You just get the right parallel adapter to add more strings if needed (2-to-1, 3-to-1, 4-to-1, etc.)
After this section, we’ll review how to connect the entire array to your solar charge controller or solar generator (portable power station).

MC4 Connectors for Series Connections
The standard solar panel connector is called an MC4 connection. It’s a great connection that’s very easy to work with. Most people can customize their own solar panel MC4 connections with ease.
The MC4 system is a plug and socket. One end has a male plug that inserts into a female socket. The socket has two tabs that keep the plug in place. You can easily undo the connection by pressing these tabs and removing the plug.
Inside of each end, there is a small metal element that crimps onto the wire. Then this crimped wire and metal element slides into the plug or socket of the MC4 connector.

To use MC4 connectors, you will:
- Strip the solar panel wire to the right length
- Crimp the MC4 metal element onto the wire (MC4 crimping tool is ideal)
- Slide the plastic nut over the wire
- Insert the crimped cable into the plastic plug or socket MC4 connector
- Verify the rubber washer sits firmly around the base of the plug or socket
- Screw the plastic nut firmly onto the other half of the plug or socket
That’s it!
To wire solar panels in series, you just use these individual connectors over and over, connecting the positive terminal of one solar panel directly to the negative terminal of another. Repeat until they are all connected.
Specialized Splitters for Solar Panel Parallel Connections
To wire solar panels in parallel, you need to get specialized splitters. These come in different layouts, depending on how many circuits you want to put in parallel.
For example, if you want to create a parallel connection from two solar panels, you’ll need a 2-to-1 splitter for each positive and negative connection.
If you have three “strings” of solar panels connected in series, and you want to join those with a parallel connection, you’ll need 3-to-1 splitters. One for the positive connection and one for the negative.
The BougeRV solar panel MC4 splitter for parallel connections are the ones we recommend the most. You just need to know how many strings you want to connect in a parallel connection before you can order. Here is the full assortment of BougeRV options:
|
|
BougeRV Solar Parallel MC4 Connector 2-to-1 Adapter |
Buy on BougeRV Buy on Amazon |
|
|
BougeRV Solar Parallel MC4 Connector 3-to-1 Adapter |
Buy on BougeRV Buy on Amazon |
|
|
BougeRV Solar Parallel MC4 Connector 4-to-1 Adapter |
Buy on BougeRV Buy on Amazon |
Solar Charge Controller or Solar Generator
The next connection you need to worry about is from the solar panels to the device that you connect them to, which may be a solar charge controller or a solar generator, aka portable power station.
This applies to nearly any use of solar panels. Whether it’s for off-grid electricity or adding solar power to your RV, it’s always similar.
Don’t forget about our calculator to help figure out the safe amount of panels you can attach to your power station, solar generator, or charge controller. We recommend using that calculator and this article together to configure your solar panels.
Solar Charge Controller
Generally speaking, solar panels are always connected to a solar charge controller. This device monitors and controls the electricity coming off of the solar panels. It also stops the flow when the batteries are full.
If you connect solar panels directly to an inverter, battery, or any other device, it’s like attaching a hose without a valve. You can overflow and damage the device. Or start a fire.
For many solar charge controllers, you’ll crimp the end of the solar panel wiring onto an appropriate terminal for the charger.
Many people use copper terminals because they resist corrosion and offer high electrical conductivity. You’ll need to match up your solar panel wire gauge with the right size terminal. Then make sure it is properly sealed. Many people opt for heat-shrink tubing. Others use different tools and techniques to ensure they’re sealed.
You can get full terminal connector kits with heat-shrink. It’s ideal to have around for projects like this.
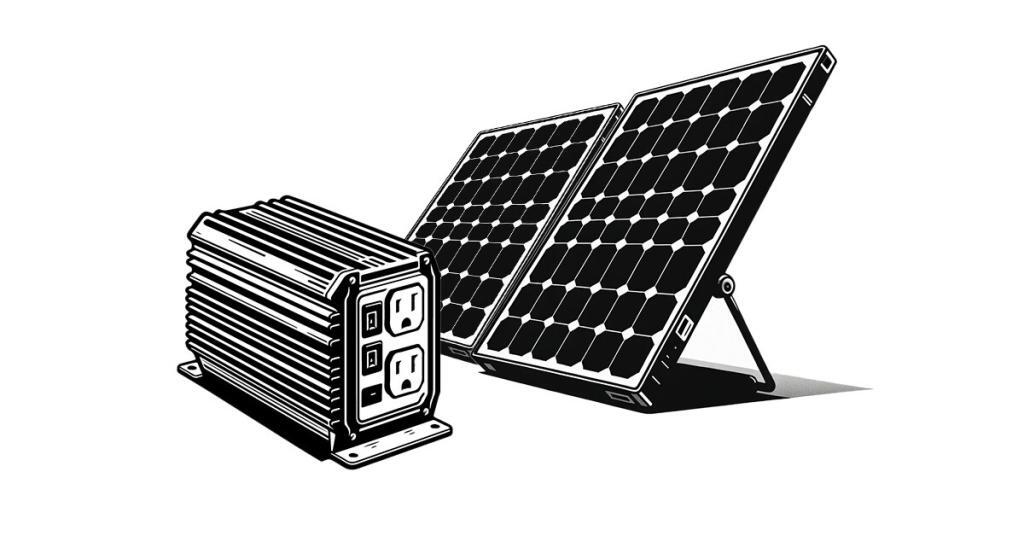
Solar Generator or Portable Power Station
If you buy a solar generator or power station, like popular EcoFlow and Bluetti models, these have solar charge controllers built into them.
Quite often, the solar generator manufacturer includes the cable that converts the MC4 connector to the one the solar generator uses. You simply use this cable to attach your solar panels to the solar generator.
For example, some Bluetti solar generators use an XT90 connector. Bluetti will likely supply what you need. But if not, you can buy these MC4 to XT90 adapters elsewhere.
EcoFlow uses similar options, including an MC4 to XT60 or XT60i. EcoFlow also offers a different solar charging cable for the EcoFlow Power Hub that uses a proprietary design. If you have an EcoFlow power station that uses the XT60 / XT60i cable, it’s best to get it directly from EcoFlow. Aftermarket cables have been known to cause issues with EcoFlow products. You can still use standard MC4 cables to extend the solar panel wires if needed.
You shouldn’t have to worry too much if you get a solar generator. Use the standard MC4 connectors and the appropriate adapter, if necessary. You should have no issue connecting just about any solar panel to any power station (as long as you pay attention to the next section).

Understanding Voltage and Amperage Limits
It’s critical that you stay within reasonable limits for voltage and amperage. There are many factors that play a role here, so let’s touch the surface for a couple of the major ones.
The biggest thing to take away from this is to use the Voc of the panels, watch out for series connections, and avoid getting too close to the input maximum. The colder the weather, the more room you need to leave.
Solar Panel Charge Controller
You must stay within voltage limits of your charger. You CANNOT exceed the voltage limit. If you do, you can seriously damage or destroy the device. You’ll probably see smoke or even fire.
Since going over the voltage is so dangerous, many people will only use 80% of the charger’s maximum voltage to be safe.
Use the Open Circuit Voltage (Voc) rating of the solar panels. And you also need to adjust it for cold weather. As temperatures drop, the voltage increases.
This is where our How Many Panels Can You Use calculator is extremely helpful. Plug in your power station’s max input, the Voc of the panels, and the temperature. It will tell you how many series connections you can use.
Now let’s talk about amps.
Some people say you can exceed the amperage limits of your charger, within reasonable limits. This is known as over-paneling. If your panels create too many amps for your charger, the excess simply won’t pass through. For example, if your panels output 60a but your charger is 50a, the most electricity that will flow through the charger is 50a.
The benefit of going over the amps (over-paneling) is that you can max out your charger safely. It is also beneficial in some situations, such as if you regularly except cloudy or stormy days. In the rare situation with sunny days when the panel output exceeds the amp rating of your charger, it won’t destroy everything (like going over voltage would).
How you connect solar panels, series vs. parallel, has a major impact on the voltage and amperage output. Series connections add voltage. Parallel adds amperage. Be very careful with series connections since going over voltage will cause damage.
Wire Gauge and Connectors
The other main aspect to consider is the wire gauge and hardware. This includes your connectors, fuses, and any other elements that are part of your solar panel connections.
Wire gauge must be carefully calculated. The length of wire, voltage, and amperage can all play a role in the gauge wire you need. Amperage has a major impact, so use extra caution with parallel connections.
The way you connect your solar panels together also impacts the types and ratings of the fuses you will need. And connectors are rated for specific electrical demands too.
Most of the time, you can use a 12AWG wire to connect solar panels. But if you have a powerful solar array or you need to go a long distance, then 10AWG can be ideal. Some systems that have a lower voltage and higher amperage will also need to use a larger gauge wire.
Make sure to carefully examine these fine details before installing solar panels.

|
Renogy 100W Solar Panel |
Buy on Renogy Buy on Amazon |

|
Renogy 200W Solar Panel |
Buy on Renogy Buy on Amazon |
|
EcoFlow 400W Rigid Solar Panel |
Buy on EcoFlow Buy on Amazon |

Connecting Solar Panel: Quick Step by Step
Here’s how to connect your solar panels step by step:
- Decide how many watts of solar panels you want. Make sure the wattage doesn’t exceed your solar charge controller’s maximum.
- Decide to connect the panels in series or parallel. Each series connection will add the voltage of each panel, but use the lowest amperage of any single panel. Each parallel connection will add the amperage of each panel, but use the voltage of any single panel. You must stay under the charger’s voltage. And you want to stay close to the charger’s maximum amperage.
- To connect solar panels in series, connect one panel’s positive terminal to the next panel’s negative terminal. Repeat this process until all of your panels are connected in series. Then connect the ends to the charger or solar generator.
- To connect solar panels in parallel, connect the positive terminal from each solar panel to an appropriate parallel splitter. Then do the same for the negative terminal. All of the positive cables will meet in one place, and have one output. All of the negative cables do the same. Then you connect the splitters to your charger or solar generator.
- You can also use a combination of series and parallel. For example, you can do two separate series of five solar panels by connecting each positive to the next panel’s negative until you have a chain of five. Repeat this for a separate chain of five. This will cause the voltage to be five times the single-panel Voc, but the amps equal to the lowest panel. Once you have your two chains of five panels each (10 panels total), you can connect them through a parallel connection using a Y splitter. This will add together the amperage, but will use whichever voltage is lowest from either series chain.
- Once you’re ready, connect the panels to your charger or solar generator with MC4 connectors, copper terminals, or the appropriate connector for your solar generator. Some use XT-60 or XT-90 connectors, others use aviation-style connectors. Some use other DC barrel connectors.
Wrap Up
Knowing how to connect solar panels starts with knowing how many solar panels you want to use in Watts. Then you figure out how to connect them together to stay within the limits of your solar charge controller or solar generator, using series, parallel, or a combination of both connection types.
Don’t forget to check out our automatic calculator for How Many Solar Panels Can My Power Station Use?
Once you know how to connect your solar panels, it’s time to check out the best solar generators for home backup or for adding to an RV.

